Which Cord Locks Provide the Best Performance for Hydration Pack Manufacturing?
I have seen countless hydration pack manufacturers struggle with cord lock failures. The wrong choice leads to customer complaints and product returns. Finding the right cord lock can make or break your product line.
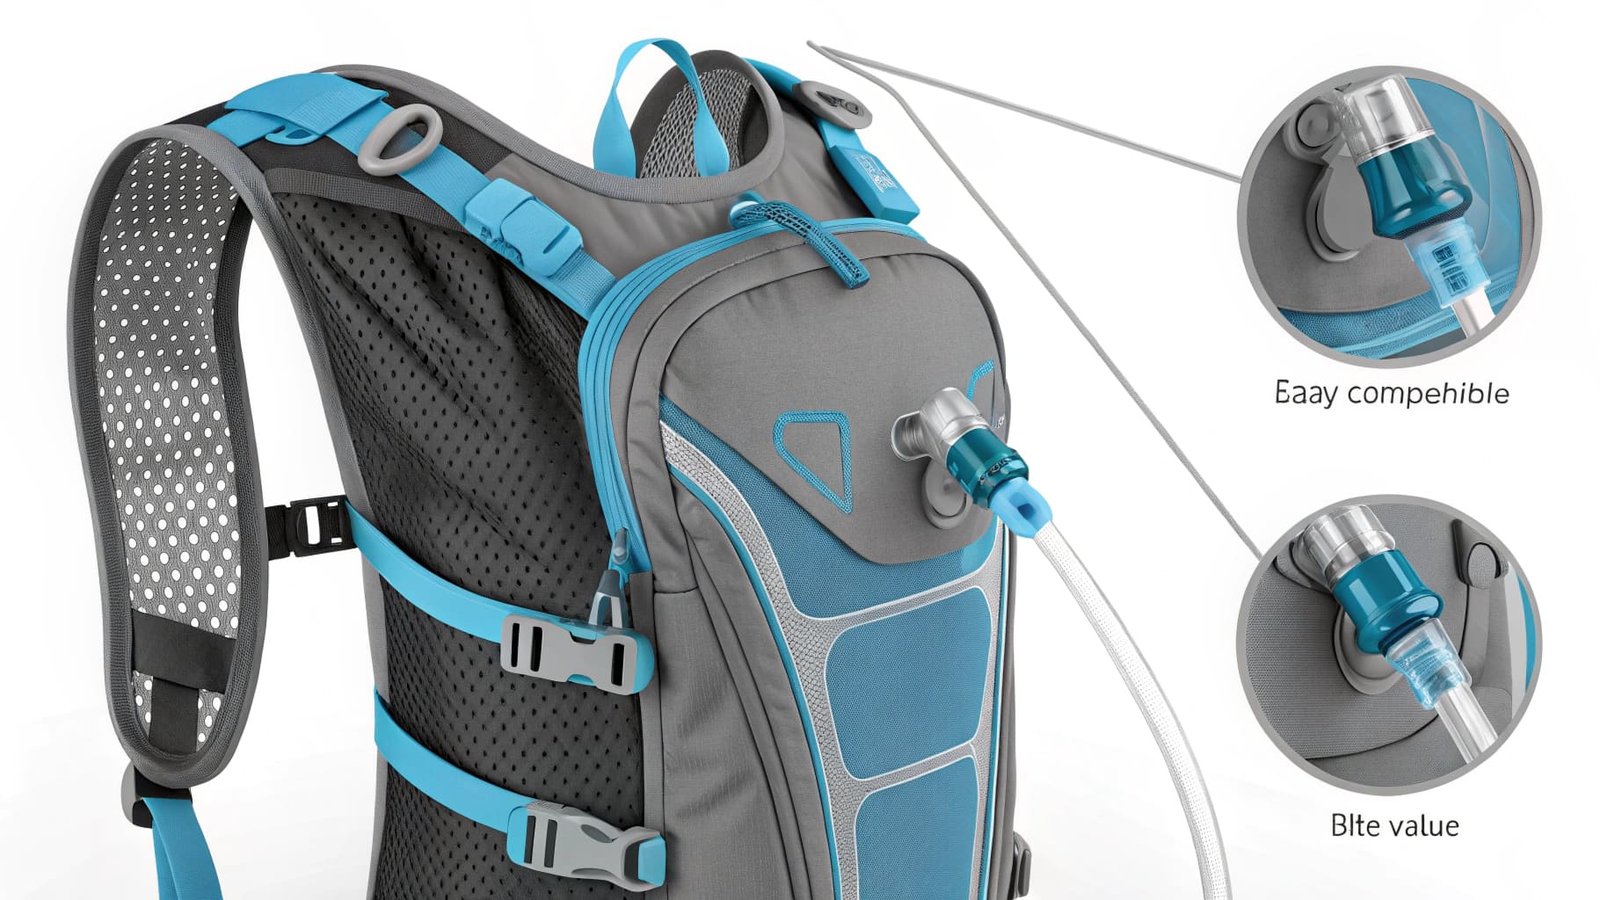
The best cord locks for hydration pack manufacturing combine silicone-enhanced grips1 with reinforced internal mechanisms. These locks must withstand 10,000+ adjustment cycles, operate smoothly in temperatures from -40°F to 450°F, and provide one-handed operation without slipping during intense physical activities.
I started working with hydration pack manufacturers three years ago. Back then, I noticed a pattern. The brands that succeeded long-term all paid attention to one thing: the small components that customers touch every day. The cord lock is one of those critical touchpoints. You might think it is just a small plastic piece. But I have watched entire production runs get rejected because the cord locks failed quality testing.
What Are the Different Types of Cord Lock?
Your choice of cord lock type directly impacts production costs and customer satisfaction. The wrong type can double your warranty claims. I have witnessed this happen to three different clients in the past year alone.
The three main cord lock types are barrel locks, spring-loaded toggles, and flat cord locks. Barrel locks use cylindrical designs for smooth adjustment. Spring-loaded toggles offer quick-release functionality. Flat cord locks provide low-profile designs that minimize bulk on your hydration packs.
Let me break down each type for you. I work with manufacturers who use all three types. Each one serves a specific purpose.
Barrel Locks
Barrel locks are the most common type I see in hydration pack production. They feature a cylindrical body with an internal spring mechanism. The spring presses against the cord to hold it in place. When you squeeze the barrel, the spring releases and allows cord adjustment.
I recommend barrel locks for mid-range hydration packs. They balance cost and performance well. The typical barrel lock I source for clients measures 15-20mm in length. The internal diameter needs to match your cord size exactly. A 3mm cord requires a different barrel than a 5mm cord.
Here is what I have learned about barrel lock performance:
| Feature | Standard Grade | Premium Grade |
|---|---|---|
| Cycle Life | 3,000-5,000 | 10,000+ |
| Temperature Range | 32°F to 140°F | -40°F to 450°F |
| Grip Material | Basic Plastic | Silicone Enhanced |
| Cost per Unit | $0.08-$0.15 | $0.25-$0.40 |
The premium grade uses silicone components. This is where my expertise comes in. Silicone provides superior grip in wet conditions. Your customers will notice the difference when their hands are sweaty or when it rains.
Spring-Loaded Toggles
Spring-loaded toggles work differently. They use a push-button mechanism instead of a squeeze action. You press a button on top. This releases tension on the cord. The cord slides freely until you release the button.
I see these toggles mostly in high-end athletic hydration packs. They allow faster adjustment than barrel locks. An athlete can adjust their pack with one finger while running. This matters for trail runners and competitive cyclists.
The downside is cost. Spring-loaded toggles typically run 40-60% more expensive than standard barrel locks. The internal spring mechanism is more complex. It requires tighter manufacturing tolerances. But for premium brands, the price difference is worth it.
Flat Cord Locks
Flat cord locks have a rectangular profile. They sit flush against the bag fabric. This design prevents snagging on branches or doorways. I recommend flat locks for urban commuter hydration packs and children's products.
The flat design uses a cam mechanism instead of springs. When you slide the lock along the cord, internal cams grip the cord fibers. This creates friction that holds the adjustment in place. The advantage is durability. There are no springs to break or wear out.
Are There Heavy Duty Cord Locks?
You need heavy duty cord locks when targeting professional and military markets. Standard cord locks will fail under extreme conditions. I have tested this with multiple clients who supply to government contractors.
Heavy duty cord locks use reinforced materials and enhanced internal mechanisms. They must survive harsh environments and intensive use. The best heavy duty locks combine glass-filled nylon bodies with silicone grip inserts. This combination provides tensile strength exceeding 50 pounds while maintaining smooth operation.
I want to share something important about heavy duty specifications. Many suppliers claim their locks are heavy duty. But they cannot provide test data. You need to verify performance claims. I always request cycle testing results before committing to a supplier.
The military-grade cord locks I source go through specific testing protocols2. First, they undergo 10,000 cycle tests at room temperature. Then another 5,000 cycles at -20°F. Then 5,000 more at 140°F. Only locks that pass all three tests qualify as genuinely heavy duty.
Material selection makes the difference. Standard cord locks use basic nylon or ABS plastic. Heavy duty versions incorporate these materials:
| Component | Standard Material | Heavy Duty Material |
|---|---|---|
| Lock Body | ABS Plastic | Glass-Filled Nylon |
| Spring | Carbon Steel | Stainless Steel 304 |
| Grip Surface | Smooth Plastic | Silicone Overmold |
| Internal Cam | Plastic | Hardened Metal |
The silicone overmold3 is critical. I have manufactured silicone components for seven years now. Silicone maintains flexibility across extreme temperatures. It does not become brittle in cold conditions. It does not soften in heat. This consistency ensures reliable performance regardless of environment.
Heavy duty cord locks cost more upfront. But they reduce warranty claims significantly. One of my clients switched from standard to heavy duty locks two years ago. Their warranty claim rate dropped from 4.2% to 0.7%. The higher component cost paid for itself within six months.
How Do You Thread a Cord Lock?
Threading efficiency impacts your production speed and labor costs directly. I have helped manufacturers reduce assembly time by 35% through proper threading technique and lock selection. Every second saved per unit adds up when you produce thousands of packs monthly.
The basic threading process involves three steps: inserting the cord through the lock body, creating a loop, and securing the cord end. However, modern cord lock designs incorporate features that simplify this process significantly.

I want to walk you through the threading process I teach to factory workers. This method works for barrel locks and spring-loaded toggles. Flat cord locks use a slightly different technique.
Start by identifying the cord lock orientation. Most locks have a wide entry side and a narrow exit side. The cord enters through the wide side. This flared entry point guides the cord into the internal mechanism. If you try to thread from the wrong direction, you will struggle.
Thread the cord through the lock body. Push it all the way through until 2-3 inches extend from the other side. Some workers make a mistake here. They try to thread both cord ends simultaneously. This approach tangles the cords inside the lock body. Always thread one end first, then the other.
Here is the step-by-step process I recommend:
Step 1: Prepare Your Materials
Gather the cord lock, drawstring cord, and any end stops you plan to use. I recommend pre-cutting cords to length before assembly. This speeds up production and reduces waste. For hydration pack tubes, typical cord lengths range from 300mm to 450mm depending on pack size.
Apply heat to the cord ends if you are using synthetic materials4. This melts the fibers and prevents fraying. A heat gun works best, but a lighter will do in small-scale operations. Hold the flame 1-2 inches from the cord end for 2-3 seconds. Let it cool for 5 seconds before threading.
Step 2: Thread Through Lock Body
Hold the cord lock with the flared side facing you. Push the first cord end through the wide opening. Guide it through the internal channel. Apply steady pressure but do not force it. If the cord catches inside, you are likely pushing too hard or using the wrong entry point.
The cord should slide through smoothly. If it does not, check the internal diameter against your cord diameter. A 3mm cord needs a lock rated for 3-4mm internal diameter. Using mismatched sizes causes threading difficulty and poor grip performance.
Step 3: Create Adjustment Loop
Once both cords pass through the lock, create a loop at the entry side. This loop connects to your hydration pack tube or closure point. The loop size depends on your specific application. For tube connections, I typically recommend 50-80mm loops.
Pull both cord ends to adjust the loop to the correct size. Then slide the lock down toward the loop to secure it. Test the lock by pulling on both ends. The lock should hold firm without slipping. If it slips, the internal spring may be worn or the cord diameter may be wrong.
Design Features That Speed Threading
Modern cord lock designs include features that reduce threading time. I work with clients to specify these features when ordering components. The most effective features include:
Flared entry points that are 30-40% wider than the internal channel. This guides cords naturally into the correct position. Color-coded threading paths that show workers the correct orientation. Internal channels with smooth walls instead of textured surfaces.
One client implemented locks with built-in threading guides. These guides are small plastic ribs inside the entry point. They separate the two cords and prevent tangling. Assembly time dropped from 8 seconds per lock to 5 seconds per lock. On a production line making 5,000 packs per month, this saved 4.2 hours of labor monthly.
Conclusion
I source cord locks based on three criteria: cycle durability, material quality, and threading efficiency. These factors determine whether your hydration packs succeed in the market or generate warranty headaches.
-
Explore how silicone grips can enhance user experience and product reliability. ↩
-
Discover the rigorous testing that ensures the reliability of heavy duty locks. ↩
-
Discover the benefits of silicone overmold in enhancing grip and durability. ↩
-
Explore the impact of material choice on the durability of cord locks. ↩